Lab4: WSL ROS2 Setup and Multicast Networking
Introduction
In this lab, you will configure ROS2 on Windows Subsystem for Linux (WSL) to communicate with your Mini Pupper over a multicast network. You’ll learn how to set up WSL in mirrored networking mode, use ROS_DOMAIN_ID for multi-robot environments, view camera images using image_view, and control the robot using /cmd_vel.
Prerequisites
- Completed WSL Setup (see Preparation > WSL Setup)
- Completed Lab1-Lab3
- Mini Pupper with ROS2 Humble installed
- Windows 11 (WSL2 mirrored mode requires Windows 11)
Part 1: Configure WSL Mirrored Networking
WSL2 mirrored networking mode allows your WSL instance to share the same IP address as your Windows host, enabling seamless multicast communication with ROS2.
Step 1: Create or Edit .wslconfig
Open PowerShell and create the WSL configuration file:
notepad $env:USERPROFILE\.wslconfig
Add the following content:
[wsl2]
networkingMode=mirrored
dnsTunneling=true
firewall=true
autoProxy=true

[experimental]
autoMemoryReclaim=gradual
sparseVhd=true
hostAddressLoopback=true
Step 2: Restart WSL
wsl --shutdown
wsl
Step 3: Verify Network Configuration
In WSL, check that your IP matches the Windows host:
ip addr show eth0
You should see an IP address in the same subnet as your Windows machine.
Part 2: Configure Windows Firewall
ROS2 uses UDP multicast for discovery. You need to allow this traffic through Windows Firewall.
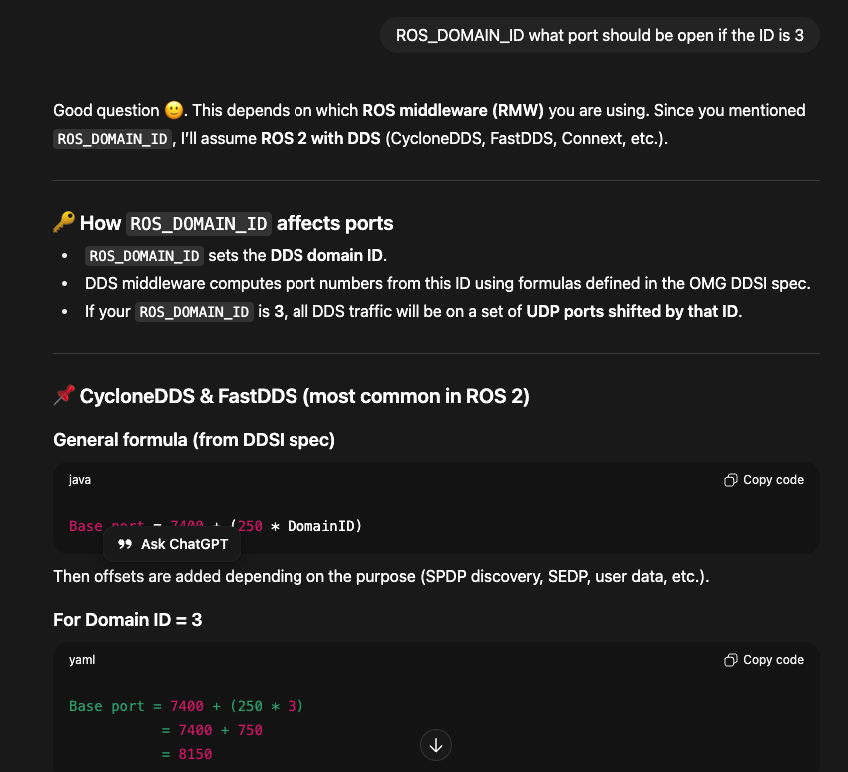
Option A: Using ChatGPT to Find Required Ports
You can use ChatGPT to help identify the ports needed for ROS2 UDP communication:
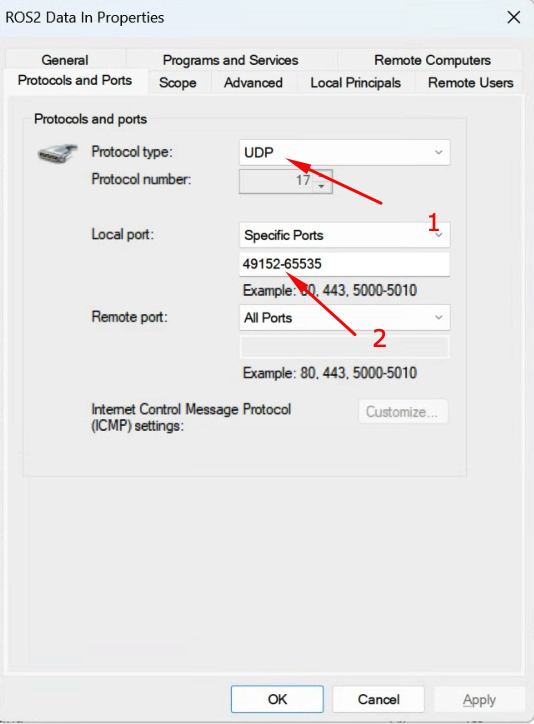
Option B: Open Required Ports Manually
Step 1: Open Windows Defender Firewall with Advanced Security
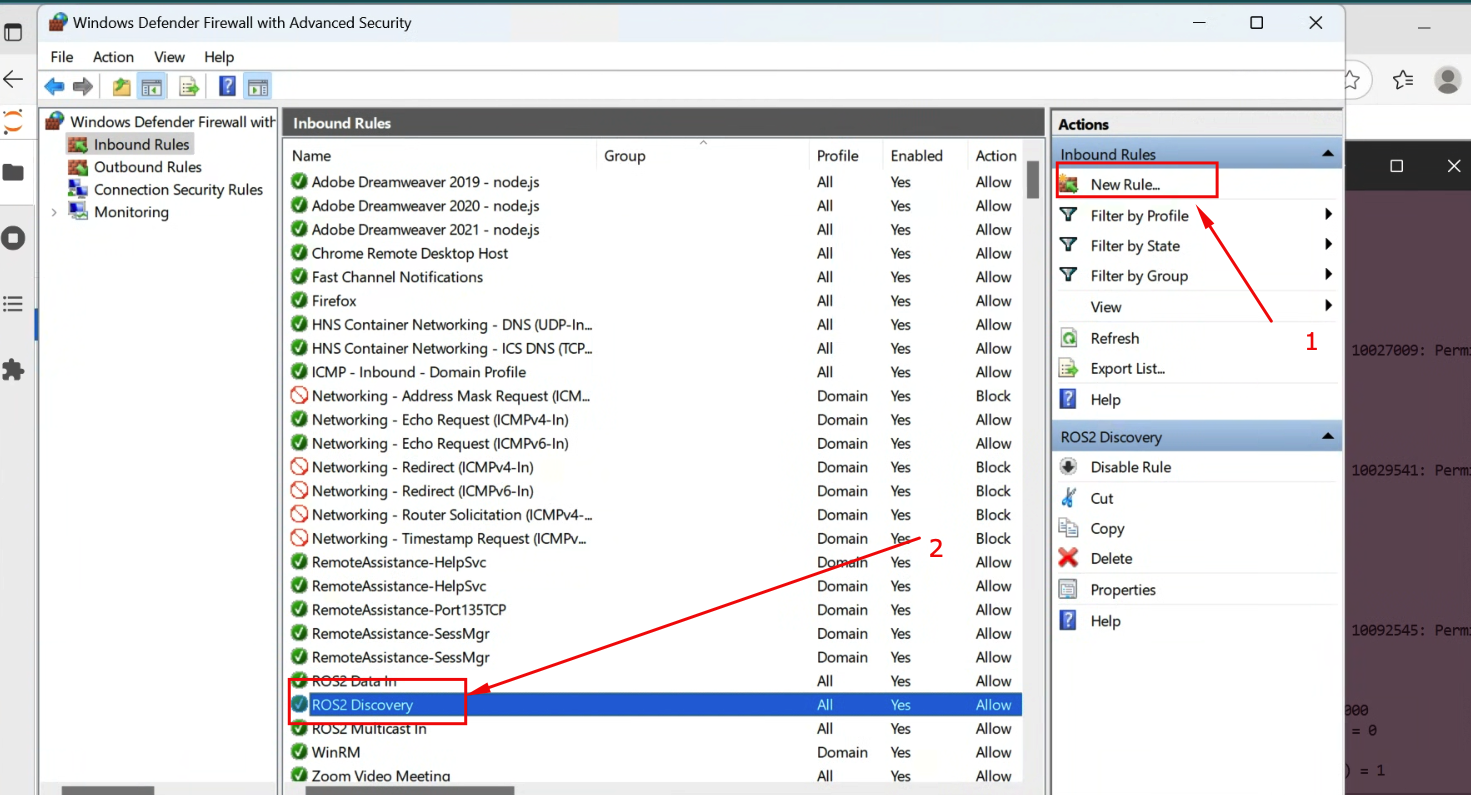
Step 2: Create new inbound rules for UDP ports
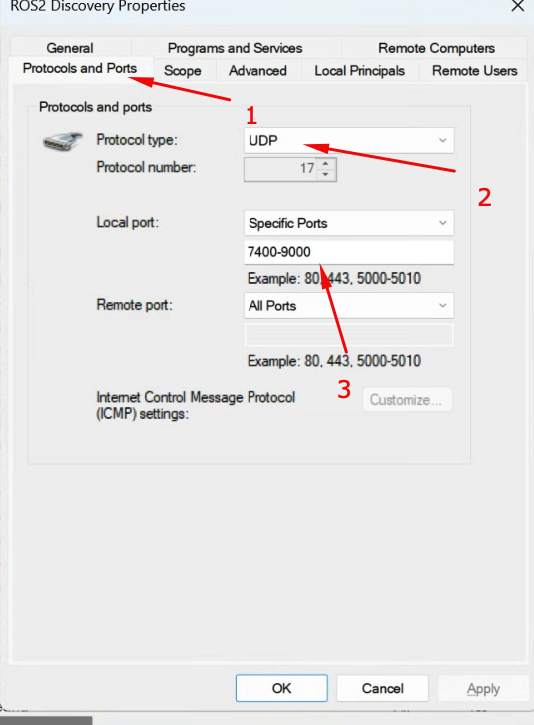
Step 3: Configure the port ranges for ROS2
Option C: Using PowerShell Commands
Run PowerShell as Administrator:
# Allow ROS2 DDS discovery (multicast)
New-NetFirewallRule -DisplayName "ROS2 DDS UDP" -Direction Inbound -Protocol UDP -LocalPort 7400-7500 -Action Allow
New-NetFirewallRule -DisplayName "ROS2 DDS UDP Out" -Direction Outbound -Protocol UDP -LocalPort 7400-7500 -Action Allow

# Allow ROS2 data ports
New-NetFirewallRule -DisplayName "ROS2 Data UDP" -Direction Inbound -Protocol UDP -LocalPort 32768-65535 -Action Allow

# Allow image viewer web ports (if using web-based viewer)
New-NetFirewallRule -DisplayName "ROS2 Image Viewer" -Direction Inbound -Protocol TCP -LocalPort 5000-5001 -Action Allow
Part 3: Understanding ROS_DOMAIN_ID
ROS_DOMAIN_ID is used to isolate ROS2 communication between different groups of nodes. This is essential in classroom or multi-robot environments.
How It Works
- Default
ROS_DOMAIN_IDis 0 - Valid range: 0-232 (recommended: 0-101 for best compatibility)
- Nodes with the same
ROS_DOMAIN_IDcan discover and communicate with each other - Nodes with different
ROS_DOMAIN_IDare isolated
Set ROS_DOMAIN_ID
On both Mini Pupper and WSL, use the same ID:
# Set for current session
export ROS_DOMAIN_ID=30

# Add to .bashrc for persistence
echo "export ROS_DOMAIN_ID=30" >> ~/.bashrc
source ~/.bashrc
Classroom Setup
In a classroom with multiple robots, assign unique IDs:
| Student | ROS_DOMAIN_ID | Robot Name |
|---|---|---|
| Student 1 | 30 | pupper-01 |
| Student 2 | 31 | pupper-02 |
| Student 3 | 32 | pupper-03 |
| … | … | … |
Part 4: Install ROS2 Image Tools on WSL
Install image_view Package
sudo apt update
sudo apt install ros-humble-image-view ros-humble-rqt-image-view
Install Additional Dependencies
sudo apt install ros-humble-cv-bridge ros-humble-image-transport
Part 5: Launch Mini Pupper with Camera
On Mini Pupper
SSH into your Mini Pupper and launch the bringup with camera enabled:
# Set ROS_DOMAIN_ID (must match WSL)
export ROS_DOMAIN_ID=30
source ~/ros2_ws/install/setup.bash

# Launch with camera
ros2 launch mini_pupper_bringup bringup.launch.py hardware_connected:=True
Verify Camera Topic
ros2 topic list | grep image
You should see:
/image_raw
/image_raw/compressed
Part 6: View Camera Image on WSL
Option 1: Using image_view (X11)
First, ensure X11 forwarding is set up. Install an X server on Windows (like VcXsrv or X410).
# Set display (if using VcXsrv)
export DISPLAY=$(cat /etc/resolv.conf | grep nameserver | awk '{print $2}'):0

# Or for WSLg (Windows 11)
export DISPLAY=:0

# Source ROS2 and set domain ID
export ROS_DOMAIN_ID=30
source /opt/ros/humble/setup.bash

# View the image
ros2 run image_view image_view --ros-args -r image:=/image_raw
Option 2: Using rqt_image_view
export ROS_DOMAIN_ID=30
source /opt/ros/humble/setup.bash

ros2 run rqt_image_view rqt_image_view
Select /image_raw from the dropdown menu.
Option 3: Using Web-Based Viewer (Recommended)
Download and build the web viewer package:
cd ~/ros2_ws/src
wget https://github.com/lbaitemple/mini_pupper_ros_aws/releases/download/class25/mini_pupper_webcam.zip
unzip mini_pupper_webcam.zip
cd ~/ros2_ws
colcon build --packages-select mini_pupper_webcam
source install/setup.bash
Launch the web viewer:
export ROS_DOMAIN_ID=30
ros2 launch mini_pupper_webcam single_viewer.launch.py
Open browser: http://localhost:5000
Part 7: Control Robot with /cmd_vel
Understanding /cmd_vel
The /cmd_vel topic uses geometry_msgs/msg/Twist message type:
geometry_msgs/msg/Twist
  geometry_msgs/msg/Vector3 linear
    float64 x  # Forward/backward
    float64 y  # Left/right strafe
    float64 z  # Up/down (not used)
  geometry_msgs/msg/Vector3 angular
    float64 x  # Roll (not used)
    float64 y  # Pitch (not used)
    float64 z  # Yaw (turn left/right)
Option 1: Keyboard Teleop
Install and run teleop_twist_keyboard:
sudo apt install ros-humble-teleop-twist-keyboard

export ROS_DOMAIN_ID=30
source /opt/ros/humble/setup.bash

ros2 run teleop_twist_keyboard teleop_twist_keyboard
Controls:
   u    i    o
   j    k    l
   m    ,    .

i/k : forward/backward
j/l : turn left/right
u/o : forward + turn
m/. : backward + turn
q/z : increase/decrease speed
Option 2: Command Line Publishing
Send velocity commands directly:
# Move forward
ros2 topic pub --once /cmd_vel geometry_msgs/msg/Twist "{linear: {x: 0.1, y: 0.0, z: 0.0}, angular: {x: 0.0, y: 0.0, z: 0.0}}"

# Turn left
ros2 topic pub --once /cmd_vel geometry_msgs/msg/Twist "{linear: {x: 0.0, y: 0.0, z: 0.0}, angular: {x: 0.0, y: 0.0, z: 0.3}}"

# Stop
ros2 topic pub --once /cmd_vel geometry_msgs/msg/Twist "{linear: {x: 0.0, y: 0.0, z: 0.0}, angular: {x: 0.0, y: 0.0, z: 0.0}}"
Option 3: Python Script
Create teleop_simple.py:
#!/usr/bin/env python3
import rclpy
from rclpy.node import Node
from geometry_msgs.msg import Twist
import sys
import termios
import tty


class SimpleTeleop(Node):
    def __init__(self):
        super().__init__('simple_teleop')
        self.publisher = self.create_publisher(Twist, '/cmd_vel', 10)
        self.linear_speed = 0.1
        self.angular_speed = 0.3
        self.get_logger().info('Simple Teleop Started')
        self.get_logger().info('Use WASD to move, Q to quit')

    def get_key(self):
        fd = sys.stdin.fileno()
        old_settings = termios.tcgetattr(fd)
        try:
            tty.setraw(fd)
            key = sys.stdin.read(1)
        finally:
            termios.tcsetattr(fd, termios.TCSADRAIN, old_settings)
        return key

    def run(self):
        twist = Twist()
        while True:
            key = self.get_key()

            if key == 'w':
                twist.linear.x = self.linear_speed
                twist.angular.z = 0.0
            elif key == 's':
                twist.linear.x = -self.linear_speed
                twist.angular.z = 0.0
            elif key == 'a':
                twist.linear.x = 0.0
                twist.angular.z = self.angular_speed
            elif key == 'd':
                twist.linear.x = 0.0
                twist.angular.z = -self.angular_speed
            elif key == ' ':
                twist.linear.x = 0.0
                twist.angular.z = 0.0
            elif key == 'q':
                twist.linear.x = 0.0
                twist.angular.z = 0.0
                self.publisher.publish(twist)
                break

            self.publisher.publish(twist)
            self.get_logger().info(f'Linear: {twist.linear.x:.2f}, Angular: {twist.angular.z:.2f}')


def main():
    rclpy.init()
    node = SimpleTeleop()
    node.run()
    node.destroy_node()
    rclpy.shutdown()


if __name__ == '__main__':
    main()
Run it:
python3 teleop_simple.py
Part 8: Complete Workflow
Architecture Diagram
┌─────────────────────────────────────────────────────────────────────┐
│                     Windows 11 Host                                 │
│  ┌───────────────────────────────────────────────────────────────┐ │
│  │                    WSL2 (Mirrored Mode)                       │ │
│  │                                                               │ │
│  │  ┌─────────────────┐    ┌─────────────────┐                  │ │
│  │  │  image_view     │    │  teleop_twist   │                  │ │
│  │  │  /image_raw     │    │  /cmd_vel       │                  │ │
│  │  └────────▲────────┘    └────────┬────────┘                  │ │
│  │           │                      │                            │ │
│  └───────────┼──────────────────────┼────────────────────────────┘ │
│              │                      │                              │
└──────────────┼──────────────────────┼──────────────────────────────┘
               │                      │
               │   WiFi Network       │
               │   ROS_DOMAIN_ID=30   │
               │   (Multicast)        │
               │                      │
┌──────────────┼──────────────────────┼──────────────────────────────┐
│              │                      ▼                              │
│  ┌───────────┴────────┐    ┌─────────────────┐                    │
│  │  Camera Node       │    │  Motion Control │                    │
│  │  /image_raw        │    │  /cmd_vel       │                    │
│  └────────────────────┘    └─────────────────┘                    │
│                                                                    │
│                      Mini Pupper                                   │
└────────────────────────────────────────────────────────────────────┘
Step-by-Step Summary
- On Mini Pupper:
export ROS_DOMAIN_ID=30 source ~/ros2_ws/install/setup.bash ros2 launch mini_pupper_bringup bringup.launch.py hardware_connected:=True - On WSL (Terminal 1 - View Image):
export ROS_DOMAIN_ID=30 source /opt/ros/humble/setup.bash ros2 run rqt_image_view rqt_image_view - On WSL (Terminal 2 - Control Robot):
export ROS_DOMAIN_ID=30
source /opt/ros/humble/setup.bash
ros2 run teleop_twist_keyboard teleop_twist_keyboard
Troubleshooting
| Issue | Solution |
|---|---|
| Topics not visible | Verify ROS_DOMAIN_ID matches on both systems |
| No multicast | Check WSL mirrored mode is enabled, restart WSL |
| Firewall blocking | Run firewall commands as Administrator |
| image_view black screen | Check camera is enabled in Mini Pupper config |
| Robot not responding | Verify bringup is running, check /cmd_vel topic |
Debugging Commands
# Check ROS_DOMAIN_ID
echo $ROS_DOMAIN_ID

# List all topics
ros2 topic list

# Check topic frequency
ros2 topic hz /image_raw

# Echo cmd_vel messages
ros2 topic echo /cmd_vel

# List all nodes
ros2 node list

# Check network connectivity
ping <mini_pupper_ip>
Verify Multicast
# On WSL
ros2 multicast receive

# On Mini Pupper (in another terminal)
ros2 multicast send
Exercises
Exercise 1: Custom Domain ID
Set up communication with a partner using a shared ROS_DOMAIN_ID.
Exercise 2: Record and Playback
Record camera images and velocity commands:
ros2 bag record /image_raw /cmd_vel -o my_recording
ros2 bag play my_recording
Exercise 3: Create Launch File
Create a launch file that starts both image_view and teleop together.
Exercise 4: Monitor Bandwidth
Use ros2 topic bw /image_raw to monitor bandwidth and experiment with different image resolutions.
Summary
In this lab, you learned:
- How to configure WSL2 mirrored networking for ROS2
- How to use
ROS_DOMAIN_IDfor multi-robot environments - How to view camera images using
image_viewandrqt_image_view - How to control the robot using
/cmd_velwith keyboard teleop - How to troubleshoot multicast networking issues