Lab4: Touch Sensor Control
Introduction
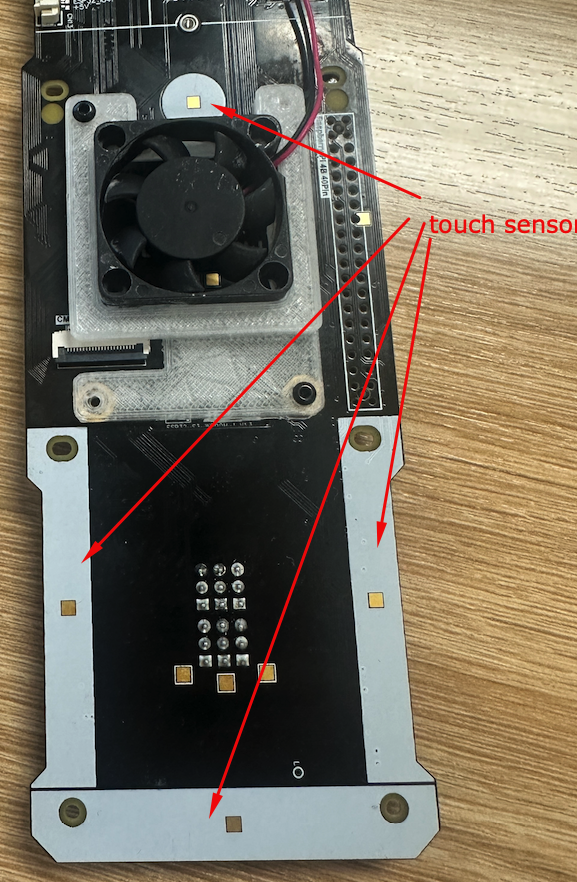
In this lab, you will learn how to use the touch sensors on the Mini Pupper. The touch sensors are the white strips located on the robot’s body. There are four touch areas: Front, Back, Left, and Right. These sensors can be used to trigger different behaviors or commands when touched.
Prerequisites
The RPi.GPIO library should already be installed on your Raspberry Pi. If not:
pip install RPi.GPIO
Running the Touch Test
Navigate to the demos folder and run the test:
cd ~/mini_pupper_bsp/demos/
python touch_test.py
Touch Sensor Layout
The Mini Pupper has 4 touch areas connected to specific GPIO pins:
| Touch Area | GPIO Pin (BCM) |
|---|---|
| Front | GPIO 6 |
| Left | GPIO 3 |
| Right | GPIO 16 |
| Back | GPIO 2 |
Complete Touch Test Code
#!/usr/bin/env python3
import time
import RPi.GPIO as GPIO

# There are 4 areas for touch actions
# Each GPIO to each touch area
touchPin_Front = 6
touchPin_Left  = 3
touchPin_Right = 16
touchPin_Back  = 2

# Use GPIO number but not PIN number
GPIO.setmode(GPIO.BCM)

# Set up GPIO numbers to input
GPIO.setup(touchPin_Front, GPIO.IN)
GPIO.setup(touchPin_Left,  GPIO.IN)
GPIO.setup(touchPin_Right, GPIO.IN)
GPIO.setup(touchPin_Back,  GPIO.IN)

# Detection Loop
while True:
    touchValue_Front = GPIO.input(touchPin_Front)
    touchValue_Back  = GPIO.input(touchPin_Back)
    touchValue_Left  = GPIO.input(touchPin_Left)
    touchValue_Right = GPIO.input(touchPin_Right)
    display_string = ''
    if not touchValue_Front:
        display_string += ' Front'
    if not touchValue_Back:
        display_string += ' Back'
    if not touchValue_Right:
        display_string += ' Right'
    if not touchValue_Left:
        display_string += ' Left'

    if display_string == '':
        display_string = 'No button touched'
    print(display_string)
    time.sleep(0.5)
Code Breakdown
1. Import Libraries
import time
import RPi.GPIO as GPIO
time: For adding delays between readingsRPi.GPIO: Raspberry Pi GPIO library for reading pin states
2. Define GPIO Pins
touchPin_Front = 6
touchPin_Left  = 3
touchPin_Right = 16
touchPin_Back  = 2
Each touch sensor is connected to a specific GPIO pin using BCM numbering.
3. Configure GPIO Mode
GPIO.setmode(GPIO.BCM)
Sets the pin numbering mode to BCM (Broadcom SOC channel numbers), not physical pin numbers.
4. Set Up Input Pins
GPIO.setup(touchPin_Front, GPIO.IN)
GPIO.setup(touchPin_Left,  GPIO.IN)
GPIO.setup(touchPin_Right, GPIO.IN)
GPIO.setup(touchPin_Back,  GPIO.IN)
Configures each GPIO pin as an input to read the touch sensor state.
5. Detection Loop
while True:
    touchValue_Front = GPIO.input(touchPin_Front)
    # ... read other sensors

    if not touchValue_Front:
        display_string += ' Front'
    # ... check other sensors
GPIO.input(): Returns the current state of the pin- Touch sensors are active LOW (returns 0 when touched)
- The
notoperator converts: touched (0) → True, not touched (1) → False
Understanding Active LOW Logic
The touch sensors use active LOW logic:
- When NOT touched: GPIO reads HIGH (1)
- When touched: GPIO reads LOW (0)
This is why we use if not touchValue_Front: to detect a touch.
Exercises
Exercise 1: Touch Counter
Create a script that counts how many times each sensor has been touched.
touch_counts = {'Front': 0, 'Back': 0, 'Left': 0, 'Right': 0}

# In your loop:
if not touchValue_Front:
    touch_counts['Front'] += 1
Exercise 2: Touch-Triggered Actions
Make the Mini Pupper perform different actions based on which sensor is touched:
- Front: Move forward
- Back: Move backward
- Left: Turn left
- Right: Turn right
Exercise 3: Multi-Touch Detection
Detect when multiple sensors are touched simultaneously and trigger special actions.
if not touchValue_Front and not touchValue_Back:
    print("Front and Back touched - Special action!")
Exercise 4: Touch with Debouncing
Implement debouncing to prevent multiple detections from a single touch:
import time

last_touch_time = 0
debounce_delay = 0.3  # 300ms

if not touchValue_Front:
    current_time = time.time()
    if current_time - last_touch_time > debounce_delay:
        print("Front touched!")
        last_touch_time = current_time
Using Event Detection (Advanced)
Instead of polling, you can use GPIO event detection for more efficient touch handling:
def touch_callback(channel):
    if channel == touchPin_Front:
        print("Front touched!")
    elif channel == touchPin_Back:
        print("Back touched!")

# Add event detection
GPIO.add_event_detect(touchPin_Front, GPIO.FALLING,
                      callback=touch_callback, bouncetime=300)
GPIO.add_event_detect(touchPin_Back, GPIO.FALLING,
                      callback=touch_callback, bouncetime=300)

# Keep the program running
try:
    while True:
        time.sleep(1)
except KeyboardInterrupt:
    GPIO.cleanup()
Troubleshooting
| Issue | Solution |
|---|---|
| No touch detected | Check GPIO connections and pin numbers |
| Multiple detections | Add debouncing or increase sleep time |
| Permission denied | Run with sudo or add user to gpio group |
| GPIO already in use | Call GPIO.cleanup() before running |
Cleanup GPIO
Always clean up GPIO when done:
try:
    # Your code here
    pass
except KeyboardInterrupt:
    pass
finally:
    GPIO.cleanup()
Summary
In this lab, you learned:
- How to read touch sensor states using RPi.GPIO
- Understanding BCM vs BOARD pin numbering
- Active LOW logic for touch sensors
- Polling vs event-driven touch detection
- Implementing debouncing for reliable touch detection